Adjusting the printing position on an ampoule printing machine is a crucial task that ensures the accuracy and quality of the printed information on ampoules. As a leading supplier of ampoule printing machines, we understand the importance of this process and are here to guide you through the steps to achieve precise printing positions.
Understanding the Basics of Ampoule Printing Machines
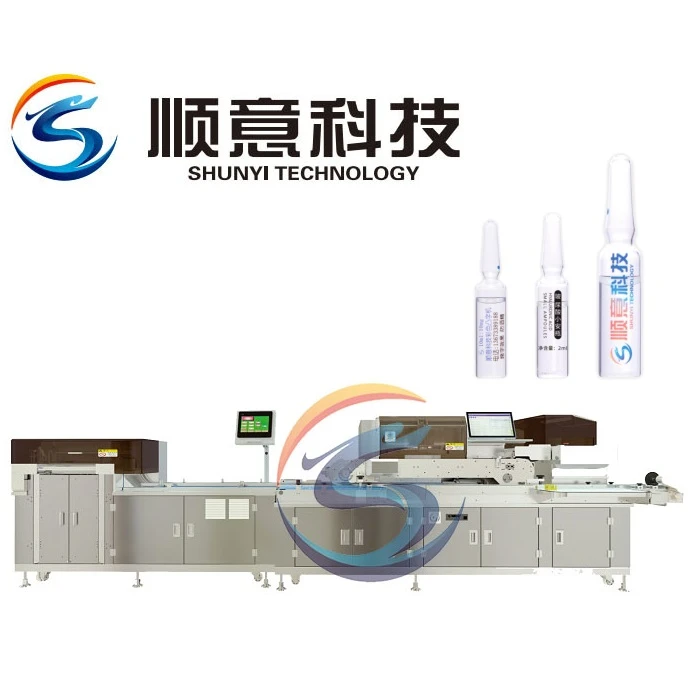
Before delving into the adjustment process, it's essential to have a basic understanding of how ampoule printing machines work. These machines are designed to print various types of information, such as batch numbers, expiration dates, and product names, on the surface of ampoules. They typically use advanced printing technologies, such as inkjet or thermal transfer printing, to ensure clear and durable prints.
Our company offers a range of high-quality ampoule printing machines, including the HD Ampoule Pharmaceutical Printing Machine, Pharmaceutical Printer, and High Speed Ampoule Printing Machine. These machines are equipped with state-of-the-art features and technologies to meet the diverse needs of the pharmaceutical industry.
Steps to Adjust the Printing Position
Step 1: Prepare the Machine
Before making any adjustments, it's important to ensure that the ampoule printing machine is properly set up and calibrated. This includes checking the ink levels, cleaning the print heads, and verifying the machine's settings. Refer to the machine's user manual for detailed instructions on how to perform these tasks.
Step 2: Position the Ampoules
Place the ampoules on the machine's conveyor belt or feeding system. Make sure that the ampoules are properly aligned and centered to ensure accurate printing. Some machines may have adjustable guides or fixtures to help with positioning the ampoules.
Step 3: Access the Printing Position Settings
Most ampoule printing machines have a user interface or control panel that allows you to access the printing position settings. Navigate to the appropriate menu or screen to adjust the printing position parameters. These parameters may include the horizontal and vertical position, rotation angle, and print offset.
Step 4: Make Initial Adjustments
Start by making small adjustments to the printing position settings. Use the machine's controls or software to move the print head horizontally or vertically, rotate the print image, or adjust the print offset. After each adjustment, print a test ampoule to check the results.
Step 5: Fine-Tune the Position
Once you have made the initial adjustments, carefully examine the printed ampoule to determine if further fine-tuning is required. If the print is not centered or aligned correctly, make additional small adjustments to the printing position settings until the desired result is achieved.
Step 6: Verify the Printing Position
After making the necessary adjustments, print a few more test ampoules to verify the accuracy of the printing position. Check the prints for clarity, alignment, and consistency. If any issues are detected, repeat the adjustment process until the prints meet your quality standards.
Tips for Achieving Precise Printing Positions
- Use a Test Sheet: Before printing on actual ampoules, it's a good idea to use a test sheet or scrap material to test the printing position settings. This allows you to make adjustments without wasting valuable ampoules.
- Clean the Print Heads Regularly: Dirty or clogged print heads can affect the quality and accuracy of the prints. Make sure to clean the print heads regularly according to the machine's maintenance schedule.
- Check the Ink Quality: Low-quality or expired ink can also cause printing issues. Use high-quality ink that is compatible with your ampoule printing machine to ensure clear and durable prints.
- Maintain a Stable Environment: Fluctuations in temperature, humidity, or vibration can affect the performance of the ampoule printing machine and the accuracy of the printing position. Try to maintain a stable environment for the machine to minimize these effects.
Troubleshooting Common Printing Position Issues
Print is Not Centered
If the print is not centered on the ampoule, check the horizontal and vertical position settings. Make sure that the print head is aligned with the center of the ampoule. You may also need to adjust the conveyor belt or feeding system to ensure that the ampoules are properly positioned.

Print is Skewed or Rotated
If the print is skewed or rotated, adjust the rotation angle setting in the printing position menu. Use a protractor or other measuring tool to ensure that the print is aligned correctly. You may also need to check the alignment of the print head and the conveyor belt.
Print is Offsets
If the print is offset from the desired position, adjust the print offset setting. This setting allows you to move the print image horizontally or vertically relative to the ampoule. Make small adjustments and print test ampoules until the print is in the correct position.
Conclusion
Adjusting the printing position on an ampoule printing machine is a critical process that requires careful attention to detail and precision. By following the steps outlined in this blog post and using the tips and troubleshooting techniques provided, you can achieve accurate and consistent printing positions on your ampoules.
As a trusted supplier of ampoule printing machines, we are committed to providing our customers with high-quality products and exceptional customer service. If you have any questions or need further assistance with adjusting the printing position on your ampoule printing machine, please don't hesitate to contact us. We are here to help you optimize the performance of your machine and ensure the success of your pharmaceutical printing operations.
If you are interested in purchasing an ampoule printing machine or would like to learn more about our products and services, please feel free to reach out to us. We look forward to the opportunity to discuss your specific requirements and provide you with a customized solution.
References
- Manufacturer's user manual for the ampoule printing machine.
- Industry best practices for pharmaceutical printing.